


Source: frimufilms on Freepik
One of the most important lessons any novice knitter has to learn is how to add a new skein of yarn when knitting. If you're working on a very large project that requires more than one skein of yarn, this will be a crucial step. Additionally, you may want to use a different color or achieve a different texture, both of which will also call for a new ball of yarn.
At first, adding a new skein of yarn might seem like a big task, especially if you've never done it before. But don't get discouraged – there are several quick, easy, and effective ways you can do this without having to give up on your project halfway through. Let's take a look at what they are.
Tools and Materials Needed
The precise tools you'll need generally depend on your chosen joining method. Some techniques for joining a new skein of yarn don't require any additional tools beyond what you're already working with – the skein you're currently using, the skein you want to join, and a pair of knitting needles. Other techniques call for an additional tapestry needle and/or scissors.
Method 1: Weave in as You Go
The basic idea behind this method is to hide the loose end inside the project (inside a sweater, on the bottom side of a pot holder, etc.) without extra tools or knots.
About 5 to 8 stitches before you plan to join a new ball, pick up the new strand and put it between the current strand and your needles. Knit a stitch with the old yarn as you normally would, while trapping the tail of the new one on the backside. Continue knitting for the next 5 to 8 stitches while wrapping the new strand clockwise around the old one. Then continue knitting for another 5 to 8 stitches using the new yarn while trapping the old one and wrapping it clockwise around the new one. Finally, drop the old strand, cut off the excess, and continue working as normal.
This method is excellent for textured yarns, but it's not the best choice for slippery fibers. It will also be noticeable on the wrong side of the work and may cause itching or discomfort in garments.
Method 2: Fisherman's Knot
Source: We Are Knitters ENG on YouTube
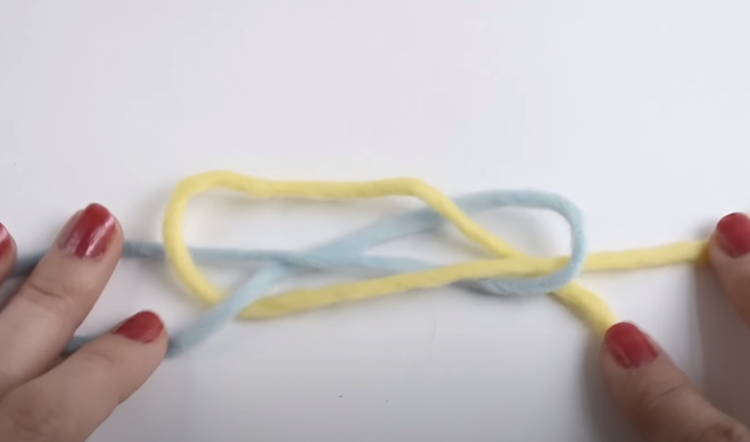
The fisherman's knot, also known as the magic knot, is another method that doesn't require any extra tools other than scissors. It's basically two overhand knots joined together.
Place the two tails you want to join – call them strand A and strand B – parallel to each other and pointing in opposite directions. Pick up strand A, put it over strand B, then pull it under strand B (think of the first knot you make when tying your shoes). Now bring the tail of strand A over strand A itself and pull it underneath. Pull tight to make your first overhand knot. Repeat the process as close as possible to the first knot to create the second one. Finally, pull both strands (not the tail ends) to join the two knots tightly together, then trim any excess yarn.
The only downside to this method is that it leaves a tiny, visible knot in your project. That shouldn't be a problem for more textured pieces or fluffier yarns.
Method 3: A United Join
Just like the previous two, the united join method is quite easy. About 10 inches before you want to stop working with the old yarn, add the new strand across the needle (the tail should stick out in front). Then hold both the new and the old yarn together and keep knitting as if they're a single strand. After three stitches, let go of the old strand and continue working only with the new one. Weave in the old yarn – ideally after you're done blocking your project – and you're done.
Depending on the yarn weight you're using, this method might leave a slightly thicker row in your finished project.
Method 4: Russian Join
Source: Yarndrasil on YouTube
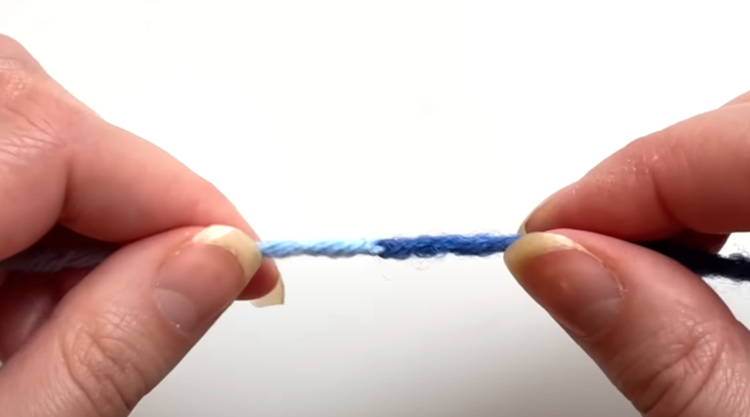
A very popular method of joining yarns is the Russian join. For this method, you'll need a sharp tapestry needle.
Thread the old yarn on the thinnest needle that will work for the yarn weight. Pierce the strand with the same yarn and push the needle through its center for 2 to 3 inches. Pull the needle all the way through – be careful not to pull too tight – while leaving a small loop at the end, then release the needle. Now thread the new strand on the needle and pull the needle through the loop of the old strand. Pull the needle through the center of the new yarn the same way you did with the old one, pull it all the way through, release it, then tug on one of the ends to tighten the join. Trim the loose tail ends.
The biggest advantage of the Russian join is that it doesn't require any weaving in afterward. It works with almost any type of yarn and is especially effective for single-color projects.
Method 5: Drop and Join
Drop and join is a simple, beginner-friendly joining method. It's as straightforward as the name suggests – you drop the tail of the old yarn and continue knitting with the new one as if there was no switch at all. Once you're done, simply weave in the ends. Keep in mind that this method doesn't work as well with very slippery fibers.
Method 6: Back Join
The back join is the method to use if you're working detailed colorwork and don't have a tapestry needle on hand (you will, however, need a pin or a paper clip).
When you get to the spot where you want to switch yarns, pierce through the yarn at the base of your last stitch with a pin, or mark the spot with a paper clip. Then undo the last 3 to 4 stitches. Lightly wrap the new strand around the pin. Fold the tail of the old yarn back and knit a stitch using both the working yarn and the folded tail. Knit another 6 to 8 stitches with both yarns, then drop the tail of the new yarn and cut it off – ideally after blocking. Like most methods that skip weaving, the back join isn't ideal for slippery fibers.
Method 7: The Wet Splice
The wet splice, also known as the spit splice, is ideal for natural animal fibers. It's practically invisible and unbelievably fast, but you won't be able to use it on plant-based or synthetic fibers.
Spread out around 1 inch at the ends of both strands, fanning them out. Carefully cut the split ends to make them thinner by about a third – this helps avoid a thicker section at the joint. Wet both ends with water and stack them on top of each other in your palm. Rub your hands together firmly for around 20 seconds. Once the strands are dry, they'll be firmly joined together.
Conclusion
Keep in mind that there isn't one best method for joining two strands of yarn together when knitting. The right method depends on the weight and fiber content of the yarns, the color pattern you're going for, the tools you have on hand, and your general skill level. Don't be afraid of some trial and error while you figure out your favorite.
Frequently Asked Questions
How do you add another skein of yarn when knitting?
There are many different methods of adding another skein of yarn when knitting. Refer to the list above to find some of the most commonly used, easiest, and most effective techniques.
How do you rejoin yarn when knitting?
Rejoining is the same process as adding a new skein of yarn. There are many different, effective methods to choose from – keep the type of yarn, color pattern, and your tools in mind when picking the best one.
How do you join yarn at the end of a row?
The easiest way to join yarn at the end of a row is with the drop and join method, explained above.