How to Knit the Garter Stitch Video Tutorial
The Garter Stitch is an easily recognizable stitch that is perfect for beginners and is the first stitch in our Sampler Stitch Project. When I first learned, knitting Garter Stitch scarves became my “go-to” project. I was taught by my Great Grandmother, who I would call for advice as my Mother and Grandmother had no clue. Usually, one of the first things my mother or grandmother would do when I was ill would be to make a Mary Maxim run for new yarn. I would then sit and knit a giant Garter Stitch scarf. Looking back at my collection of giant scarfs that varied greatly in length from barely useable to big enough to keep several people warm, I could tell how long I stayed in by the length of the scarf. I was always so appreciative of my family’s support of my crafting hobbies, and those are some of the items I wish I kept around.
How to Knit the Garter Stitch
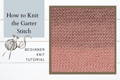
The Garter Stitch is the perfect beginner stitch. All you need to know how to do is the knit stitch. It’s a wonderful first-time stitch. Try a few projects in the garter stitch, take a look at this video on the right. This is an easy Triangle Scarf that requires no increasing or decreasing stitches, no shaping, and just a little bit of decorative ribbing at the bottom. You can even choose to leave out the purl stitches, and it will still look beautiful. Check out our post on how to purl as well.
Step 1, begin with a long tail cast on and cast on the following using Mary Maxim’s Best Value Yarn:
10″ block: 46 Stitches
5″ block: 23 Stitches
These stitches, measured after a few rows, gave me approximately 9 3/4 inches when worked up in the Garter Stitch. The Garter Stitch is very stretchy and will stretch out a bit when used, so I wanted to accommodate for this. If you knit a few rows and are not getting between 9 3/4 inches and 10 1/4 inches, then count how many stitches it would take to achieve that and start over.
Step 2: knit the entire row of stitches, turn.
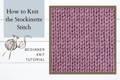
Step 3: (stockinette stitch) purl the first two stitches, then continue in the knit stitch until you reach the last two stitches, purl the last two stitches of the row, turn.
Take a look at the Garter Stitch and the Stockinette Stitch together. The garter stitch is a stitch where the edges lay flat. The stockinette stitch curls under itself. To ensure that your finished garment remains flat, designers often work stitch combinations like the garter stitch or the Moss Stitch into the pattern. Usually just a few stitches will be enough to get the job done.
Stay Tuned
Be sure to follow us on Social Media!
Happy Crafting!