How to Crochet a Cow [Instructions & 20 Free Patterns]

Source: Tatyana Konteeva on Pexels
When we think of cute animals, we usually think of dogs, cats, and bunnies. But there is one animal that can steal your heart in a blink, one that we don’t often think of as cute – the cow. Whether you’re a fan of cows or know someone who is, crocheting a cow can be a great way to honor these beautiful creatures. But how do you crochet a cow, exactly?
Materials Needed
Like with any other crochet project, before you begin working, you should gather all the necessary materials. In this case, you will need:
- Yarn – Since we’re crocheting an amigurumi cow, it would be best to use amigurumi yarn. We recommend Circulo Amigurumi light DK yarn. In addition to being the right weight and type, it also comes in a wide variety of colors (we recommend using the shades white, black, mustard, and macadamia);
- Crochet Hook – If you go for our yarn recommendation, you should use a hook size G-4. However, always stick to the hook size specified in the pattern or on the yarn packaging;
- Tapestry needle and a black thread;
- A pair of safety eyes;
- Poly stuffing.
How to Crochet a Cow: Step-by-Step Instructions
Step 1: The Head
When making amigurumi crochet projects, it is generally best to start with the head and work your way down (that is, if the pattern allows it). In general, the cow’s head should be relatively simple to make, as it is a basic spherical shape (although more advanced patterns may require a little more skill than just crocheting a ball). Depending on the pattern, the head and the body may be worked together or separately.
Step 2: The Body
The body, while also spherical, is a little elongated. However, this shouldn’t pose too much of an issue, even for beginner crocheters. If you’re planning to make a realistic-looking toy, you should reserve your white yarn for the head and body.
In more complex patterns, you may need to crochet the cow’s black spots as you go. In others, you can add them later.
Step 3: Legs (Make 4)
It is generally a good idea to make the legs separately and then sew them onto the body. This is because they are very differently shaped than the body itself. If you’d rather do the whole thing in one go, there will be some patterns listed below that do that.
Step 4: Tail
Lastly, a cow’s tail can be as simple or as complicated as you make it. At its simplest, it will be a single chain using one or two yarn colors. More complicated versions of the cow’s tail may include pom makers, more complex stitches, and, if the cow is big enough, even some stuffing.
How to Assemble a Crochet Cow
Step 1: Attach the Different Parts to the Body
The easiest way to attach the legs and tail to the body is by sewing them together. But before you do that, make sure to fasten them to the body using pins first. This way, you can be sure you’re sewing each piece exactly where it should go.
Step 2: Face Details
A toy cow without a face likely won’t be any kid’s top pick. There are quite a bit of details here to pay attention to, including ears, horns, eyes, and nose. The ears and horns will, in most cases, be separate mini-projects that you will attach later. When it comes to the nose, you could crochet it as you crochet the head using a simple color switch. Or, just like the ears and horns, it can be made separately and then attached to the head.
Lastly, when it comes to eyes, safety eyes generally look the best and most realistic. However, these can be a choking hazard for toddlers and babies. So if you’re making the cow as a gift to a kid, it might be better to embroider the eyes using some black thread.
Step 3: Optional: Udder
Optionally, your cow can also have an udder. Due to its shape, this could easily become the most difficult part of this entire project. So if you’re still a beginner, it might be a good idea to skip the udder altogether or find a pattern with a simple method for crocheting the cow’s udder.
Step 4: Finishing
Finally, it’s time to attach the udder, horns, ears, and nose to the cow, too. You should go about this the same way you did with the legs and tail – pin everything first in the right location, and then proceed sewing.
How to Crochet a Cow: 20 Free Patterns
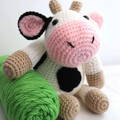
Red Heart Crochet Cow Stuffie Pattern
Source: Yarnspirations
This free Red Heart Crochet Cow Stuffie Pattern is an easy-level project, but we recommend it for beginner crocheters who are on the ambitious side. This is because this pattern requires a bit of attention to detail (just look at those ears!).
Cow Amigurumi Free Pattern

Source: Stringy Ding Ding
If you’re looking for a pattern that’s a little simpler, but still adorable, this Cow Amigurumi pattern will be right up your alley. The most challenging part of this pattern is making the udder, which is quite detailed given the size of the finished toy.
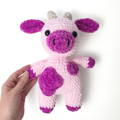
Crochet Strawberry Cow
Source: Rose and Lily Amigurumi
If you’re searching for a less realistic-looking cow, this Crochet Strawberry Cow may do the trick. The gorgeous purple bovine will steal the hearts of many, and it only calls for some basic stitches and increasing and decreasing.
Crochet Squishy Cow

Source:Rose and Lily Amigurumi
This extra-huggable cow might not be as rooted in realism as the previous few, but it is probably the most adorable one on this list. If you decide to follow the free Squishy Cow pattern, you can also size it up and make the cow even bigger – and more huggable.
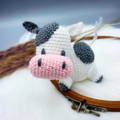
Cute Little Harvest Moon Cow
Source: Last Stitch on the Left
The Cute Little Harvest Moon Cow pattern is a project in which you’ll get to make a tiny, yet adorable cow that is so small, it can be used as a keychain. The best part about this pattern is that it takes only a few hours to complete, so it would make for a great last-minute gift, too.
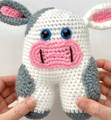
Mia Moo Moo Cow Pattern
Source: A Crafty Concept
Mia Moo Moo is an amigurumi cow that may look simple, but it actually requires some skill to crochet. The special stitches used in this pattern include invisible decreases, the magic ring, and continuous rounds.
Wooly Bully Crochet Pattern

Source: I Am Branching Out
The Woolly Bully is not your regular-looking cow. This pattern is modeled after the beautifully unique highland cows. The pattern itself is relatively easy and beginner-friendly, but it does call for quite a lot of yarn, given the size of the toy.
Red Heart Cow Slippers Pattern
Source: Yarnspirations
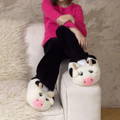
This Red Heart Cow Slippers Pattern brings together cuteness and practicality. With these slippers, not only will your feet never be cold, but you’ll also have something adorable to look at every time you look down or put your legs up.
Free Crochet Cow Hat Pattern
Source: Pretty Darn Adorable
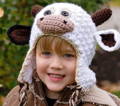
Here’s yet another practical, cow-inspired project – the free Crochet Cow Hat Pattern! If you purchase this hat pattern, it will come in a total of five sizes, ranging from newborn to adult. The free version, however, still includes the 6-12 months range and the 1-3 years range.
Zoya the Cow
Source: Amigurum
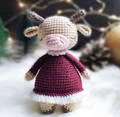
Zoya the Cow is an elegant little creature in a dress. Despite being quite small (just over 4 inches), it involves a lot of details, separate parts, and sewing. In other words, be ready to put quite a bit of work into it.
Little Cow
Source:Ravelry
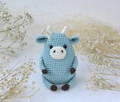
This tiny, adorable Little Cow comes in two sizes – 2.6 and 3.5 inches. It makes for a great gift for a kid, but if you ask us, we’d just put a bunch of these all around our home – it’s that cute.
Crochet Cow Potholder

Source: Crochet for You Blog
Looking for a housewarming gift for someone who’s really into cows? Consider this Cow Potholder Pattern. In fact, this cow is a member of a larger potholder family, which also includes pig, chicken, and sheep potholders, so you could also make a matching set.
Amigurumi Cherry Blossom Cow

Source:Crafty Kitty Crochet
Spring is right around the corner, and this Cherry Blossom Cow Pattern is an excellent way to celebrate the changing seasons. Although you can make this cow using any color yarn you want, we think that the original pink Red Heart Super Saver Yarn matches the cherry horns perfectly.
Cleo the Crochet Cow

Source: Chai Coffee Crochet
If you’re looking for a cow pattern that is more summer-focused, this Cleo the Crochet Cow Pattern will do the trick. Cleo is wearing a colorful spaghetti-strap tank top – it really doesn’t get more summery than that!
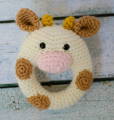
Crochet Cow Rattle
Source: crochet365knittoo
This Crochet Cow Rattle is the perfect gift for a baby who’s slowly exploring and learning about the world around it. If you choose to follow this pattern, aside from the usual materials (yarn, hook, etc.) you will also need to find a rattle noise insert or a squeaker.
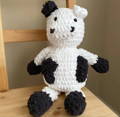
Pillow Cow Pattern
Source: Lion Brand
Everybody from adults to kids, and even pets, will appreciate this super-soft Pillow Cow. The finished pillow measures about 3 inches tall when seated, making it perfect both for snuggling and playing.
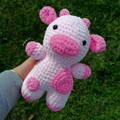
Cow Plushie
Source: Ribblr
You can’t go wrong with a classic-looking cow toy. Despite appearing quite simple at first glance, this crocheted Cow Plushie is an intermediate-level project. In other words, if you pick this pattern, be ready for some work.
Cuddle Me Cow Amigurumi Pattern

Source:Amigurumi Today
The cuddly Cuddle Me Cow Amigurumi is inspired by all the colorful beauties of spring (or by the 1960s, depending on who you ask). This is yet another intermediate-level project, so if you’re still a beginner, you might be better off picking a different cow project.
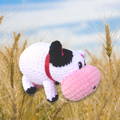
Story of Seasons Crochet Cow
Source:Summerbug
The Story of Seasons Crochet Cow is a chubby little creature that is bound to make your heart melt. The original uses the Loops & Threads Sweet Snuggle Yarn, but you can also go for Premier Parfait Chunky Yarn in the colors white, black, and pink lemonade.
Free Amigurumi Crochet Highland Cow Pattern
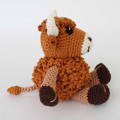
Source: My Crochet Chums
We’re finishing off this list with another highland cow project. The Free Amigurumi Crochet Highland Cow Pattern is available in both US and UK terms, so no matter where you’re from, you should have no problem tackling this easy-level project.
Happy Cow-cheting!
With this many great, free patterns to choose from, we’re sure you’ll find a crochet cow that’s right up your alley. No matter which project you pick, we hope it turns out exactly how you imagine it! Happy crocheting!

