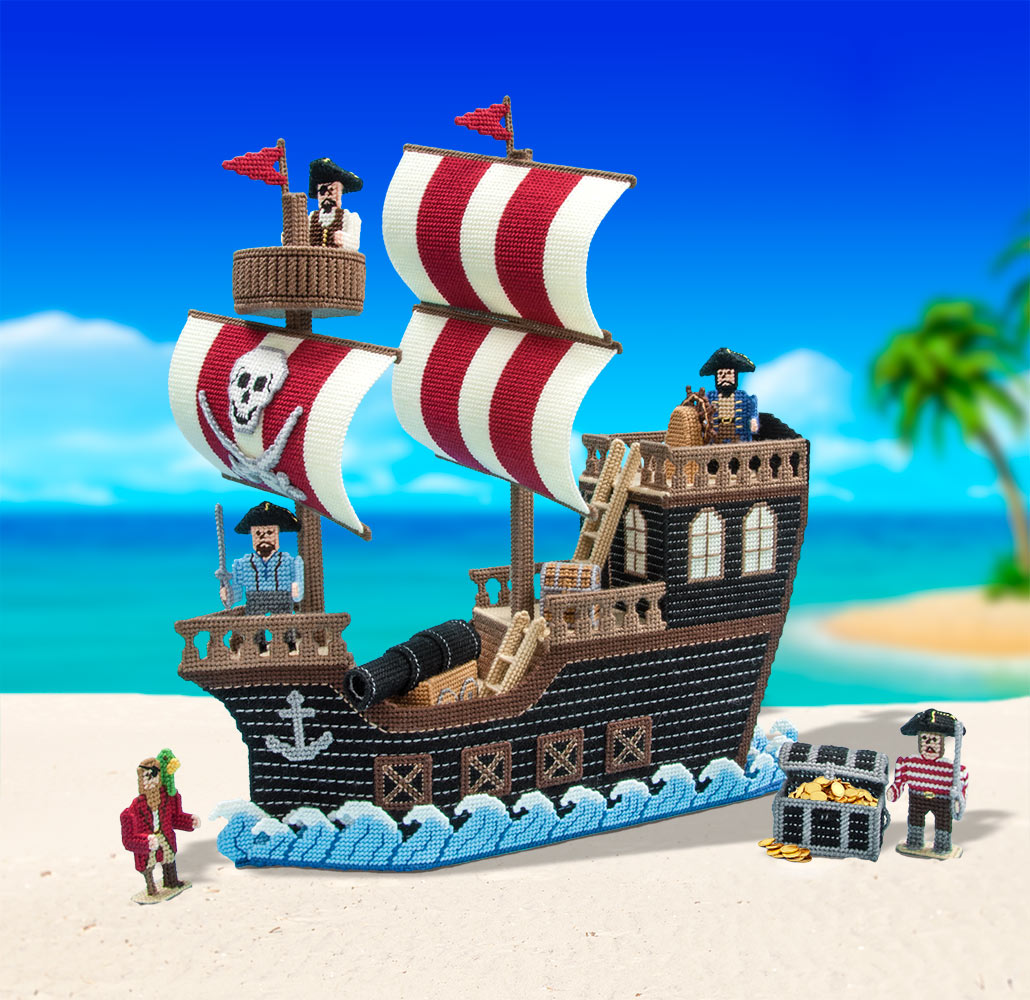
Kit de toile en plastique pour bateau pirate
Kit de toile en plastique pour bateau pirate est en rupture de stock et sera expédié dès qu’il sera de retour en stock.
Livraison et expédition
Cliquez ici pour voir toutes les informations sur nos expéditions.
Retours et échanges
Retours et échanges
Vous remettez en question un achat ? Ne vous inquiétez plus avec jusqu'à 90 jours de retours gratuits .
*Cela s'applique uniquement aux retours aux États-Unis.
Cliquez ici pour voir toutes nos informations de retour et pour créer un retour.
Description
Description
Important Information
Project Type: Plastic Canvas
Paiement et sécurité
Méthodes de payement
Vos informations de paiement sont traitées de manière sécurisée. Nous ne stockons pas les détails de votre carte de crédit et n'avons pas accès aux informations de votre carte de crédit.
Pourquoi nous choisir
-
Entreprise familiale et exploitée
Fondée par Willard et Olive McPhedrain en 1956, Mary Maxim est toujours détenue et exploitée par la famille McPhedrain.
-
Plus de 65 ans de confiance
Depuis 1956, des millions de clients font confiance à notre produit et à notre marque.
-
Connaissance et confiance
Au cours des 65 dernières années, nous avons beaucoup appris. Nous nous efforçons de trouver des produits de la meilleure qualité, d’embaucher les meilleurs designers et d’offrir la meilleure expérience client possible.
Let customers speak for us
from 108264 reviews
Not started it yet but it is beautiful yarn and pattern looks fun

just the right amount of challenge for me,beautiful picture, quality was only average

Love it,

This is AMAZING yarn!!! Crystal really hit this out of the park! It feels sooo good in my hands as I’m crocheting and the colors are so touch and vibrant.

Great prices,quality yarn . Speedy delivery. I often buy from this website.

Great price ,speedy delivery. I love this website and get most of my yarn here.

I am not new to Tunisian crochet but I am new to cables. I was having issues. I contacted Mary Maxium and Julie got back to me. Julie was a big help and patient walking me through the steps. I ended up reversing the cables because I felt this was easier. If you can see my picture you can see a cable from left to right (bottom right) which looks kind of pinched but going from right to left looks much better. IMO.
Thank you Julie for your help and getting back to me.

I was pleasantly surprised at how soft this yarn is. I will be ordering again.

This afghan turned out beautiful, as I knew it would. It was fun to make, and it goes perfectly in the bedroom it was intended for. The graph was easy to follow, and the instructions were great.

This is the exact match to the dusty rose color from joanns. It was a great price!

Exactly what I need and arrived very quickly!

So soft and slight shine! Works up beatifully.

Never disappoints

I love it

I really like this yarn.
What customers think about the store
The store offers high-quality yarns and craft supplies with reasonable prices. Customers praise the softness, vibrant colors and ease of working with the yarns. The patterns are generally straightforward to follow. Efficient shipping and good customer service ... The store offers high-quality yarns and craft supplies with reasonable prices. Customers praise the softness, vibrant colors and ease of working with the yarns. The patterns are generally straightforward to follow. Efficient shipping and good customer service are also highlighted. Overall, the store receives very positive feedback for its products and services.
Read moreAI-generated from customer reviews.
Love this plastic canvas kit, and this will be my second time around making this, because it was so much fun the first time around!
This is a huge kit, it was packages great all the pieces are there and the pattern instructions are good, the quality of the plastic canvas is good and the yard is nice. I'm excited to start this one.
For starters, this is not for a beginner, with that said I had the most enjoyable time putting this together and learning so much from this kit.
I finished with this pirate ship about three months ago. It was a tough pattern and was lots of fun to do for the boys. Though as @RachelLien81 said: In my opinion, there is room for improvement. I agree. First off, it is NOT for a beginner, and the instructions could be better with more photos and detail in stitching. Needless to say, I had so much fun putting this together, (even after having to purchase more canvas...lol). As @ Johanna P. said: It’s taken a long time to make, and has been my only project for awhile. The boys absolutely loved it and were amazed that I had made this. lol
The sails did not have a back side, and I had started off just stitching away, than ended up taking them out and stitching one specific way so that the back was consistent. As for the masts; I actually cut two pieces from stock and made them square, giving it more support, than with the bottom still open, I reached up in there (Not Easy!) and tied them both to the deck walls. This made it absolutely sturdy. As @RachelLien81 stated: I ended up creating two support pieces for under (14 squares in a line on top with 3x4…shaped like a T…that I attached to the underside of the crow’s nest and then attached the 3x4 section to the column). I really wish I had done something like that and recommend it for others.
As for my own tweaks: I stitched their last name on the back where the gold scroll work was. Second, it was flimsy, so I unstitched the bottom piece and cut pieces of ultra-stiff canvas to fit inside the walls of the ship and up into the cabin area, and tied them with thread. Third, I cut extra pieces for the base of each pirate and stitched it so that the bottom looked like the inside of the crow’s nest. I also made two sets of pirates (one for each of the boys). Fourth, as for the rails, I completely redid them. I had tried two different ways and ended up settling with stitching the inside stitches, than attaching both rails together as one, instead of how it was listed. Fifth, I cut and stitched an extra crow’s nest bottom, than tied it on with thread, this way it looked so much better. Sixth, was the sword. This I ended up cutting them like the diagram except for making them 15 holes on the bottom, and wrapped it up to tie on the back side as to create a hole to fit over the hand.
As @Sandra J says: I agree with the first reviewer in that it would have been helpful to have an assembly diagram. I forget which section it was, but I had a hard time understanding some of the instructions at first.
As @Janice stated: The only reference you had was the one picture. The hats needed a little diagram to make it easier to assemble. For me, these were a challenge. (again thank you to Vicky for the photos)
Finally, I can't express just how much fun this was to make. Over 450+ hours and nine months, but not bad for a beginner. A huge shout out to Vicky at May Maxim for all the phone support and the side wall cut out. If you are interested in seeing a video of the ship please email me at [****]
I am so excited about doing this project. I love pirate ships and this will be fun to make. It will take me a while to do but it is hot here and will be perfect to keep me busy
I have made quite a few doll houses from plastic canvas and have learned a lot of tricks along the way. I just finished (literally about 1 hour ago) constructing this pirate ship. It’s such a cute pattern and was a lot of fun to put together. In my opinion, there is room for improvement.
The sails did not have a back side…and so the back stitches were very obvious. I ended up constructing a back side for each of the three sails and stitched them together. This did make the weight heavier and I ended up with the challenge of keeping the masts from twisting. If you are putting this together, I would suggest perhaps stuffing the columns with maybe some type of filler along with the included wood dowels so they don’t twist and move around.
Another challenge I had was with the crows nest. It also wasn’t supported well and flopped around. I ended up creating two support pieces for under (14 squares in a line on top with 3x4…shaped like a T…that I attached to the underside of the crows nest and then attached the 3x4 section to the column). That was a huge improvement and the nest no longer flops around. I’ve also added wire behind the stitching around the rim of the crows nest to help hold the circular shape. I’ve noticed that plastic canvas easily cracks at bends and pressure points. If you add some wire, it helps to hold shape.
The middle deck side rails do not connect to anything near the ladder. I had a problem with them cracking where they attach to the black part of the ship and had to construct another piece to sew over top the damaged rail to connect to the ship cabin.
I did add a few things to the pattern. I constructed a tiny box for the inside of each treasure chest. I also purchased gold sequins and beads, which I then sewed with regular sewing thread to the top of the box insert. The boxes with the sequins “gold” can be removed if you would rather use the chest to store swords or hats.
I also thought it would be fun to have a plank…and so I cut a slit in the deck floor in order to put a plank that can slide into the deck…and can be pulled upwards and out over the railing. And why have a plank if you don’t have danger lurking in the water below?…so I also created a pattern for a shark fin. It sits on the floor or table next to the ship…as if the shark body is submersed in the water and only the fin rises out.
Other modifications…instead of attaching the anchor to the side…I actually made a yarn rope and a spinning piece that winds the rope and anchor up and down. I also made the steering wheel to be able to spin.
I know I added a lot of extras to this pattern…and that’s really the neat part about these kits. When you have experience enough to know the strength of the canvas and what things to do and not to do…you can really run with your imagination and make this your own creation. It’s nice to have a pattern and kit to give you the basic idea…but then have some fun and run wild with your imagination!